WESTFIELD KITCHENS BRINGS TO YOU AN OVERVIEW OF FITTING A KITCHEN IN WESTEND GLASGOW.
WE ARE PROFESSIONAL KITCHEN FITTERS FEEL FREE TO VISIT OUR WEBSITE FOR MORE INFO www.westfieldkitchens.co.uk
If you are planning to fit your own kitchen then just follow our step-by-step guides and instructions to help you on your way. We have included photos to assist the DIYer and to give you a better understanding on how your stunning new kitchen can be built.
Not only will you save hundreds of pounds by fitting a kitchen yourself, but you will also have a great sense of pride once it has been fitted.

Fitting a New Kitchen
FITTING A NEW KITCHEN – 1 What you need
To completely fit a new kitchen you need to be a competent DIYer, with good skills in carpentry and a good knowledge of electrical and plumbing work. If some of the work needs to be carried out by a plumber, (Gas Safe registered for gas work) joiner or an electrician then these are costs that need to be considered. Even with these costs you can save a lot of money fitting the kitchen units yourself. I was recently quoted around £1500 to fit a basic kitchen and the quote excluded plumbing and electrical work so there are great savings to be made with DIY.
Fitting a new kitchen isn’t a ‘two minute job’ and requires a lot of tools :-
Battery drill / driver plus wood and masonry drill bits, electricians screwdrivers, power / pipe detector, claw / lump hammers, bolster chisel, spirit level, pliers, side cutters, pump pliers, saw, Jigsaw, tape measure, sealant gun, square, marker pens.
Don’t forget safety equipment such as goggles, face mask and gloves. If you are using 240volt power tools use an RCD protection device.
Always remember Safety comes First, check before starting work where the services are in the kitchen, use a power / pipe detector to check for hidden live cables and water / gas pipes before removing the old kitchen units, drilling holes or chasing out walls.
FITTING A NEW KITCHEN WESTEND GLASGOW – 2 Plan the layout
To plan your new kitchen layout start by taking measurements of the kitchen area, when you have finished it is worthwhile double checking your measurements to save a lot of future problems.
These are some points to consider with your layout :-
The sink unit is usually positioned under a window.
Sink units and hobs should not be positioned too near or on a joint in a worktop.
Washing machines and dishwashers should ideally be positioned near the sink as this will reduce the amount of plumbing required.
Hobs require space on either side for pan handles.
Extraction units should be installed either near, or preferably on, an outside wall.
Don’t ‘box in’ any gas appliances as they require good airflow for correct operation and safety.
Are the existing services in suitable positions for your new kitchen layout, i.e. sockets and switches should not be positioned above hobs or cookers.
Will the new kitchen be user friendly and practical.
Wall units and the base units below them, should where possible, be the same width, so doors and handles line up.
Sockets should be around 150mm from the finished worktop to allow room for the plug top flex, they can of course go higher, if you know the size of tiles you are going to use, it is in my opinion easier to tile if the socket(s) are on the tile line.
Before you carry out any electrical work in the home check out the building regulations on the Government or local authority website specifically the Part P regulations and Electrical safety in the home. Although I am aware of the current rules it is worth reading the latest regulations as they have been updated in the past.
Any gas work will require a Gas Safe registered plumber / engineer.
When you have made a list of the units required for the kitchen don’t forget all the extras such as cornice, pelmet, plinth, corner post, jointing kit with coloured jointing compound, water waste kit, decorative clad end panels to match the doors, including maybe an extra one to use for filling any gaps, any appliance doors, etc.
FITTING A NEW KITCHEN WESTEND GLASGOW – 3 Preparation
The first step towards fitting your new kitchen is removing the old one. Wear the appropriate safety equipment, gloves, goggles, etc.
 Remove all the doors, drawers and shelves first, then remove any screws that are fixing the worktop(s) to the base units. If the worktop edges are under tiles you may have to remove some, if not all of them to ‘free up’ the worktop. Some old kitchens have the worktop glued to the base units so the only removal solution may be a lump hammer and crowbar.
The units themselves should be relatively easy to remove and come apart fairly easily, especially with ones trusty lump hammer, but watch out for hidden cables and pipes, an indoor pool is not always appreciated. Once the water is turned off, the pipes cut and the sink unit removed, it is a good idea to fit in-line / gate valves to the remaining pipes, at least this enables the water to be turned back on, and fitting new pipework should hopefully not have to interrupt the water supply. Try and get some assistance when removing the wall units as they may be heavy or simply awkward to handle by yourself.
If you are disconnecting any electrical supplies, switch off the consumer unit and remove the fuse / miniature circuit breaker as well, this reduces the chance of the circuit becoming ‘live’ if the consumer unit is switched back on by accident, double check the supply is ‘dead’ at the point of disconnection, if in doubt use the services of a qualified electrician as electric shocks can be fatal. Don’t attempt to disconnect any gas supplies, the law says this can only be carried out by a Gas Safe registered plumber / engineer.
So now the kitchen area is cleared, any repairs to existing walls and floors can be carried out. Holes in walls for air extraction and waste pipes can drilled / knocked through, electrics and plumbing can be installed to suit your new kitchen, don’t forget electrical supplies for wall unit lighting and the extract fan if they aren’t already in position, usually when an oven and separate hob is installed the oven comes fitted with a 13amp plug top and may require the installation of an extra socket outlet, the electric hob is then connected to the cooker switch, as this can have a much higher current demand.
FITTING A NEW KITCHEN WESTEND GLASGOW – 4 Where to start

Your new kitchen units have been delivered and the kitchen area is ready for the install, but where do you start ?. The first job to do is check the level of the floor, wherever the highest point is measure up 870mm and mark the wall, this measurement allows 720mm for the base unit and 150mm for the plinth. From your mark draw a level line using your spirit level across the wall(s), this is the guideline for all your base units, now measure up from the 870mm mark to the bottom of your wall units (this measurement is down to personal preference) , I would suggest 400 – 440mm, from this mark draw a level line across the wall(s), and finally measure up from the mark to the top of the wall units i.e. 720mm, and once more draw a level line across the wall(s). Now double check your lines are all level.
Create a space where the units can be assembled, some of the unit flat-packs can be very heavy, so get assistance when lifting them, use the cardboard packaging to cover the floor to stop the units from getting scratched, and keep all the hinges and coloured blanks in a box for later. Assembling the first unit using the instructions can take a while, but once you have an assembly method the rest will go together quite quickly. If you are using a battery drill / driver without torque control take care not to over tighten screws, it is sometimes safer to use a screwdriver for the last one or two turns.
If your kitchen is in a ‘L’ or ‘U’ shape start fitting the units from the corner working out in both directions. Before fixing the wall units I prefer to place the first base unit levelled up and in position, then I mark the wall with a vertical line from its edge so I have guideline for the wall units so they will line up with the base units. Wall units usually come with two fixing brackets each, when you have assembled the wall unit, measure where the fixing brackets need to be in order for it to ‘hook on’, transfer the measurements to your wall and fix the brackets securely, I normally drill the fixing(s) at a slightly downward angle as this reduces the chance of the fixing ‘pulling out’. Use good quality fixings and in the case of plasterboard, use cavity fixings where the brackets don’t land on a wall stud. For peace of mind on a plasterboard wall I always fit additional angle brackets between the wall studs and the top of the wall unit so I know I have a good fixing, they may be a little unsightly but they are usually out of sight and can be painted or papered over, at least you know the wall unit won’t become a base unit overnight !. Mount each wall unit checking them with a spirit level and making sure the edges are flush as you go along, they are adjustable via two screws inside either top corner of the wall unit, one screw raises or lowers the unit, the other pulls the unit tight against the fixing bracket and locks it in position. At this stage don’t worry about any small gaps between the wall unit end and the wall itself.
As I explained earlier in this post, start installing the base units from the corner ( if you have one ), make sure each unit is level before moving onto the next one, use your 870mm level line as the guide, The sink base unit will of course require holes drilling to allow the water / waste pipes through to the bottom of the sink unit, Don’t fix the units to the wall until they are all in position and you are sure they are all level. Most flat-pack kitchen units come with two male / female bolts that can be fitted between each unit, these usually require a hole drilling of approximately 5mm dia through the sides of the units, but when fitted hold the units together and keep the edges flush ( drill new holes for the bolts, don’t be tempted to use existing ones as they may be for drawer runners, etc ).
FITTING A NEW KITCHEN WESTEND GLASGOW – 5 Worktops
I am assuming for the purpose of this post that you will be using joint strips between the worktop edges, you can of course cut a mitre joint using a router and jig but this is a task where I would use the services of a skilled joiner, these cuts have to be precise and the cost, not forgetting the wait for a replacement worktop, has in the past put me off having a go. If you are skilled and confident enough to cut a mitre joint, check first that your router has a collet big enough to take an half inch (13mm) router bit, as the ‘bits’ which cut to worktop depth usually as far as I am aware have an half inch (13mm) shank, whereas most DIY routers will only take up to an 8mm shank. Butt joints (worktops joining edge to edge) are easier but have to be cut accurately, on the reverse side of the worktop(s), slots have to be cut-out using a router and jig, clamping brackets which sit in these slots are then tightened from below when the worktop is in position on top of the kitchen units.

Worktop jointing clamps

Coloured joint sealant and solvent
Try not to have the joint too near any of the ends of the base units as the clamps may be difficult to gain access to and tighten up. Coloured jointing sealant should be put onto one edge of the two sections of worktop and as you tighten the clamps check constantly how flush the worktop edges are simply by touch, take care not to over-tighten the clamps as the finished edge of the worktop might start to ‘lift’ . When you are satisfied with the quality of the joint, clean away surplus joint sealant with the solvent that should be supplied with it. Incidentally the coloured sealant is very handy to mask any small chips or scratches that may unfortunately occur during the fitting of the worktop(s).
- Fitting kitchen worktops requires assistance, not only for cutting them to length, but also because of their size and weight, the last thing you want to do is to damage one when placing it on top of the new kitchen units. If you have a ‘U’ or ‘L’ shaped kitchen start with the centre or ‘back’ worktop. Before you cut the worktop to length measure along both the back and front edges of your base units just in case the walls are not quite square and transfer these measurements to your worktop. Double check your measurements and remember you can allow a few millimetres for any end that will have wall tiles overlapping the worktop edge, then do the cut, this can be done using a woodsaw, but a jigsaw certainly makes the task easier, just remember to use goggles and a face mask, if you can’t see your cutting mark on the worktop use masking tape and re-mark the cutting line. When positioning the worktops on the base units you may have to chase out a bit of plaster along the wall to allow the worktop front edge to line up with the base units, ideally the worktop should extend over the base units front edge by an equal amount along its whole length.
- Now measure the other worktop(s) again, across both the front and back edges of the base units and cut to size allowing for the joint strip. Seal the end of the worktop with either pva glue or clear sealant before fitting the joint strip to stop any future liquid spillage from damaging the worktop. When you are satisfied the worktop(s) are sitting on the base units correctly you can mark out your cuts for the sink unit and hob, once again use masking tape if you cannot see your marking out clearly. If you are fortunate the sink unit and hob will come with templates to mark the worktop for cutting out. Generally the hole to be cut is around 5 – 10mm less than the circumference of the sink unit or the hob. The sink unit can be placed face down on the worktop, the circumference can be marked out, then reduce this cut by the appropriate measurement all round. The hob may have no template but should have the cut out dimensions supplied with it, these dimensions need to be marked out very accurately and make sure the hob is in the position you want it . Double check your measurements before making any cuts in the worktop (I fitted a hob recently which only had a 5mm edge that rested on the worktop so I must have checked my marking out at least several times). These cuts can then be made using a jigsaw. When you have completed the cuts and the worktop(s) are back in position they can be fixed using the screws supplied with the base units. Again seal the cut-outs of the worktops with pva glue or clear sealant prior to fitting the sink unit and hob.
- FITTING A NEW KITCHEN – 6 Finishing the project
- Fitting the hob and sink unit is fairly straightforward, both come with clips that hold them down tightly to the worktop. Hobs usually have a thin foam or rubber seal around the edge and this is sufficient to keep any liquids out. Only you know whether you are competent enough to reconnect the hob to the electrical supply. I would recommend you use a qualified electrician who will use the correct size / type of cable and connect the hob correctly for safe use. With gas hobs you should use a Gas safe registered plumber / engineer to connect the hob to the gas supply.
- Before fitting the sink unit, if possible fit the tap(s) with two flexible water pipes to it, each around 30cm long (which will save a lot of time when reconnecting the pipework) and also run a bead of clear sealant approximately 6 – 8mm thick under the edge of the sink unit which should be more than adequate to keep out any liquid, then position the sink unit in place and tighten the clips until it is secure. Be careful not to over-tighten the clips as they tend to ping off and are difficult to refit. Remove any excess sealant from the outer edge of the sink unit. Now you can fit the waste pipework and finish plumbing in the water pipes to the tap. Now the plinths can be cut to length and fitted, they usually attach to the base unit legs via plastic clips that are fixed to the reverse side of the plinth. The cornice and pelmet can also be cut to length. Using a mitre saw power tool can give a very

- Fixing blocks
- good quality, clean cut and therefore a better finish, especially if any angled cuts are required. Don’t forget the goggles and face mask. You may want to wait before cutting the pelmet to length as any tiled walls could alter its required length. Both the cornice and pelmet can be fitted to the wall units using fixing blocks with of course the correct size screws. Wall unit lights can be fitted, but again you may wish to wait until any tiling has been completed.
- So finally the drawers and doors can be fitted, drawers are relatively easy to assemble following the instructions. Attach one door at a time to the units, hinges are normally in two parts, one for the unit and one for the door. Fit the unit one(s) first so they are ready to accept the door. Now fit the other parts to the door.

- Two part hinge
- Handles both for the doors and drawers may require two fixing holes being drilled, there are dimple marks on the reverse of the doors to indicate where to drill the holes, these holes should be drilled as straight as possible and with the correct size drillbit to suit the fixing screws for the handles. When fitting the doors make sure the two parts of hinge mate together correctly otherwise it will be difficult to adjust the door. As you look at the hinge, the screw at the back holds the door in place, the other one enables you to adjust the door later for alignment. When all the doors are fitted they can be adjusted so gaps between them are even and all doors are level.

- Chrome door handles
- When finishing off the new kitchen its worth sealing any gaps at the back of the worktops with clear sealant so there is less risk of water damage before the wall(s) are tiled. Any small gaps between the kitchen units and the wall(s) can be filled using cuts of decorative clad end panel, doing this gives the kitchen a more professional finish. As shown in one of the images below I partly filled a gap between a washing machine and a wall using a piece of 75 x 15mm timber with cabinet magnets on the reverse for ease of removal, then simply tiled the timber using liquid nails as an adhesive, it was simple to do and leaves a small gap for washing machine movement. The last job aside cleaning up and telling everyone how hard you have had to work like I do, is to blank any pre-drilled holes in the units with the plastic blanks / caps that come with the units.
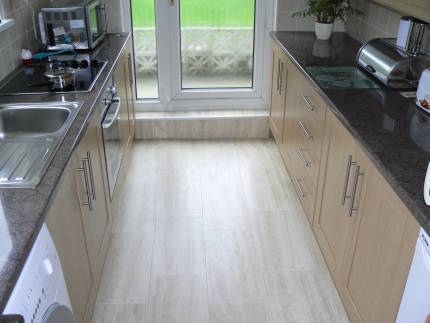
- Below are a selection of thumbnail images from a recent new kitchen install. They show before and after, etc.


